Showing posts with label Pressure Canner. Show all posts

Sunday, October 2, 2011

The Cure for the Common Cold, Chicken Noodle Soup (-the noodle)

If you read my previous post, you learned that I hate canned carrots.  But, I have so many in my garden that I need to preserve some of them in canned form.  The rest will just go down in the root cellar.  Just about the only thing I will eat canned carrots in is Chicken Noodle Soup. So I decided to make some. 

 Besides, it is the cure for the common cold ya know ;-)

I do not put noodles in my soup when canning.  The reason?  I do not like mushy noodles.  All you have to do is get some yummy egg noodles, and boil them in water.   While they are cooking you reheat a jar of the soup.  Once the noodles are cooked you drain and add them to your soup.  Bing, Bang, Boom, No more mushy noodles.

I know a wonderful lady at my local farmers market who has free range pastured poultry, and all natural grass fed beef.  (here is her blog http://countrychickengirl.blogspot.com, I love  Kathi she's awesome!)  Yesterday, I bought one of her big chickens to make this.  The chicken I bought from her is about 4.5 pounds.  You can use a bigger chicken, or smaller depending on the amount of soup you would like to make.

First thing I did was thaw out my chicken and rinse it off, inside and out (I threw away the heart and liver).  I wore gloves when I did this just because I'm a little OCD about Germs.  I then grabbed my giant stainless steel heavy bottom pot, tossed my chicken in there, and filled it up with water, until it covered my chicken by about 1 inch of water.

Turn the heat on high and bring to a boil.  Once it starts to rapid boil, you'll want to turn your heat to a medium high, or 6.5 on my stove, just so it simmers.

As it cooks, the chicken will start to float up to the top of the water.  This is fine, just make sure to stir it around periodically and turn it over in the process.

You'll want to keep stirring it periodically.  At this point, my chicken has been in the pot about 2ish hours. 
(I didn't actually time it, but you'll want to cook it until it's joints get loose or the meat falls off the bone.)

Once it's cooked you'll want to remove it from you broth.  I let it rest/cool off for a little while. 

While the chicken is cooling, I turn my stove up to high and bring my broth back up to a rapid boil.

Then I start cleaning and chopping up my veggies.

Get out your handy dandy veggie scrubber and start cleaning!  Scrub all of the dirt and grim off your carrots.

Chop of the tops and the ends.  If you have rabbits, (like me)  they love the greens from carrots.  Or you can add them to your compost pile if you don't.

I slice my carrots pretty thin, maybe a 1/8th to 1/4 of an inch.

This is a 4 cup measuring cup, and as you can see, my cup runnith over.

So once I have all of my carrots cut up, I get all of the meat off of my chicken.  Make sure that you do not include the cartilage, or the bones.  This can take a little while to do, especially if your chicken isn't cool enough.  This ended up being about 5 cups of meat.

I add the chicken, back into the pot.  Along with 1 large Vadilla onion, 2 cups of chopped celery, and 2 cloves of Garlic.  All of which I got at my local Farmers Market. 

I <3 my Farmers Market!  And everyone who works there!

  I also added 1 T of canning salt, and pepper to taste.  

You can add other herbs if you want, but keep in mind, if you use fresh herbs their flavors tend to intensify once pressure canned. (I didn't add any to mine)


I let my soup boil and cook for about 5 minutes; then I added my carrots in.

 I let it cook a little longer, but only as long as it took me to wash, peel, and cube 5 fist sized potatoes.  Then add them to the mix. 

I only let them cook about 5 more minutes.  You don't want to cook them thru.  Remember you will be pressure canning them and they will cook thru in there.  If you cook your potatoes all the way thru, they will either disintegrate, or be very, very, very mushy.  No bueno either way.

I put them in Hot Sterilized Jars.  Wipe the rims and put the lids on.  As you can see some jars will have more goodies in it then others.  I actually ended up with about 5 jars of nothing but chicken stock (which you can still can with your soup and use in other recipes)

I added 3 quarts of Boiling water and 2 T of Vinegar to my pressure caner before adding the jars.  Then I put the pressure caner on high until steam comes out of the top and the safety pops up.  Then I add my weight (15 pounds of pressure).  Once it starts to rock gently I set my timer for 1 hour 15 minutes for pints, and 1 hour 30 minutes for quarts.   Once your time is up, remove your caner from the heat, allow the pressure to dissipate, the safety to drop, and remove your jars.

This is what they look like when they come out of the caner. 

I ended up with 18 pints and 1 quart jar of Common Cold Cure.

When it comes time to cook, just boil up some egg noodles and add them to your soup when you are reheating it.  Never have a mushy noodle again!

Enjoy!

Carrots

So I personally can not stand canned carrots.  Its the sweet with the mushy I can't do... 

But the other members of the family like canned carrots, so since we planted some this year, I decided to can them. 


I first sent up my jars in sections of one pressure canner load.

Try to use a fresh of carrots as you can.  I pulled some up from the Garden, but you can also buy some from your local farmers market, or the store if you can't get to your farmers market.

I trimmed the tops off to make them easier to work with.  Grab your handy dandy Veggie Scrubber and get to work! 

You can see that they look kind of dry and dirty, the brush helps to get the little spots of dirt out.

You can see in this picture where I have and have not scrubbed.  This gives you some kind of idea of what they should look like.

This is a fully scrubbed carrot.

Cut off the tops and a little of the bottom.

I place mine in a colander to rinse off one more time.  Remember your carrots came out of the ground, it doesn't hurt to add an extra rinse.

I just give them a good cold rinse.  Make sure to check each carrot one more time to make sure you got all of the dirt and grim off.  If you don't, you might have gritty canned carrots.

So, as you can see, it's a Boy! lol  When I was digging up my carrots I came across this little guy.  Those with a sense of humor will appreciate this.  lol

Once you've rinse them all again you'll want to chop them up.  Well how big you ask??

This big.  I placed a quarter next to it so you can see the size.

You can leave your carrots in bigger pieces, or make them more into medallions.   The cooking time is the same either way.  I did this size, because its a good eating size.

Add your carrots to hot sterilized jars.

Add 3 quarts of water to your pressure canner, along with 2 T of vinegar if you have hard water.

For each Quart jar you'll want to add 1 t of canning salt.  YES THERE IS A DIFFERENCE!  Table salts have a filler in them which make your water cloudy when canning.

and 1/2 t of canning salt for Pints.

I ended up with 5 pints, and 1 quart jar.

Prepare your lids by pouring boiling water over your 2 piece lids.

Pour boiling water into each jar leaving 1 inch of head space. 

I run a knife along the edge of the jar, to get out any extra air bubbles.  If you need to you can also add some more boiling water to make up for the air lost.  Just make sure you leave 1 inch of head space.

Wipe the rims, then put the 2 piece lid on and screw on until finger tight.

This is what they look like before you can them, I've noticed with carrots that there isn't as much shrinkage as with other veggies like green beans.  For the most part, they will stay the same size once they come out of the pressure canner.

Put them in your pressure canner.

Put the lid on, and turn your burner on high.

Once steam starts coming out of the top, and the safety pops up...

Put your weight on (10 pounds of pressure).  Once your weight starts to rock back and fourth gently you'll want to set your timer for 25 minutes for Pints, and 30 minutes for Quarts.


When they come out this is what they'll look like. 

Enjoy!!!

Wednesday, September 7, 2011

Greener Beans

So if you have a garden next year, I HIGHLY recommend planting a lot of green beans.  They are so easy to grow, are usually pretty productive, and are delicious!  Plus when they are ripe, there is nothing like fresh green beans sauteed in butter, with a little bacon.  YUMMMMM!!! 

But if you plant like I did this year, you will have WAY more then you can eat in one sitting.  So it's time to break out the Pressure Canner!  Green beans are usually the first thing I can in the pressure canner each year.  

My plants this year were VERY productive!  But as fall approaches my plants are starting to die back.  I've had a bunch of "baby" green beans on my plants for about a week.  Usually it takes 5-7 days for them to go from "baby's" to "adult" green beans.  But because my plants are dieing back they didn't get very much bigger then the adolescent stage.  So I picked them and pulled my plants for this year.

You can see the difference between the sizes.  I did have a couple of Big green beans, but majority of what I had on my plants were itty bitty.

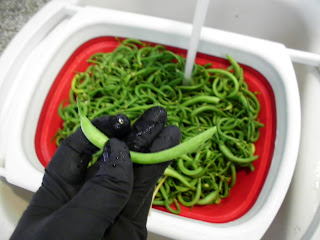
The first step in the canning process is to pick your green beans.  Then you want to wash them really good in a colander. 

When you pick them they will usually have a pointy end and a stem end.  Both of these need to be snapped off before canning.  Why?? I have no Idea.  The canning Goddess known as my Mother-in-Law told me to do so, so I do it. lol

When you get both end off this is what they will look like. 

I then snap them into littler pieces.  You do not have to do this, I just like having them broken up, you tend to be able to fit more in a jar as opposed to leaving them whole.  But, it is all about personal preference, it doesn't make a different when canning.

So when the ends are all broken off and they are all broken into pieces.  You put them in the Sterilized Jars.  Cram them in there.  They will shrink, no matter how tightly you think you have them packed they always shrink.  I mean don't put so many in that they squish, just make sure they are full and compacted down a little bit.

Once they are packed in there, you'll want to add 1/2 t canning salt for pints, and 1 t for quarts.  If you want lo sodium green beans then you can leave this out.

I ended up with 4 pints of Green Beans.  So I just put the canning salt right on top.  When you add the boiling water the salt will all mix in and be dissolved.

Usually while I am filling the Jar with the green beans I'll start my Tea Pot.  I just pour in enough to cover the green beans, leaving about 1 inch of head space.

Once you fill the jars with the boiling water, you will need to use a butter knife to get all of the air bubbles out.  There will be a bunch of little tiny air bubbles through out the jar.  I tried to take a picture of some of them, but they are kind of hard to see.

I usually run my knife around the outside of the jar and push the knife towards the center a little to let the bubbles come to the top.

I'll also usually stab a couple of times down the center to make sure I get all of those bubbles worked out.  At this point if you need to add more boiling water to fill them up, do so.  Sometimes when all of the bubble's get worked out you'll need some more water added.

So then, you'll want to wipe the rims of the jars, and put the lids and bands on.  Once they are finger tight, you'll want to add 3 quarts of boiling water to the pressure canner along with 2 T of vinegar if you have hard water.  You'll want to process them them at 10 pounds of pressure for 20 minutes for Pints, and 25 minutes for Quarts. 

ALWAYS FOLLOW MANUFACTURES GUIDELINES WHEN PRESSURE CANNING!!!!!!!!!!

If the guild that came with your pressure canner tells you to do something different then what I have said.  FOLLOW THEM!!!  I bought my Pressure canner at Walmart because I cannot afford the super fancy ones with dials, and gauges.  I am writing my "how to" stuff assuming you have the same pressure canner.


 So when your green beans come out of the canner they will sometimes be boiling.  This is normal and will eventually stop. 

Also when they come out of the pressure canner the color will change, and you will have some shrinkage.  THIS IS NORMAL!   Have no fear! 

So there ya have it, homemade from the garden freshly canned green beans.  ENJOY!!!