So I was fourtunate enough to know a Farmer at the Farmers Market whose neighbor has about a 1/2 mile row of Wild Plums. SOOOOoooo.... For about 2 weeks I went and we picked buckets of yummy plums. This is the last batch that I juiced.
Usually I make either Wild Plum Jelly, or Wild Plum Honey. But before you can make the jelly or honey, you have to Extract the Juice from the Plums.
This is also the same process I use when juicing Chokecherries for Jelly.

The first thing you want to do when starting is get out your trusty colander, wash, de-stem, and pick out the bad plums. Then, put them in your handy dandy giant pot.

This is about a 3 galon's buckets worth of Plums.

You'll want to add enough water just so you can see it. Same thing goes for the Chokecherries. Once it's full go ahead and put it on your stove on High. Stirring Frequently.

It will start to boil. All of the plums will start to float to the top of the water. As the break open and pop, they will start to sink to bottom of the pot.

So you can see that majority of plums are still whole, but some of them are starting to pop.
So while it is on high heat, from the start, you'll want to let it boil about 20-30 minutes. Sitrring Frequently.

Then turn it down to medium. You can see that there aren't as many plums floating at the top. That's because about half of them have poped.

this is what the pulp looks like.
The pictures above were taken before I made this video :)

So as the pot continues to cook, everything will turn to a slurie.

Majority of the plums should have cooked down by now. Now you are ready to get your colander and cheesecloth ready! I will usually do this while the juice is at about this point, because in not to long of time it will be done.

Grab a stainless steel pot that is big enough to hold a lot of juice, but small enough that your colander will fit nice and snugly inside the top.
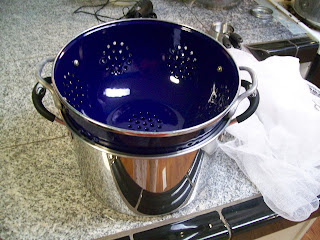
This is about perfect. There a couple of the wholes on the top side of the pot, but I usually don't worry too much about it. Once you add the cheesecloth it usually won't leak thru.

There are 4 layers of cheesecloth that I just kinda loosly push into the colander. You want to make sure you have some extra on hanging off the ends. This will help in the morning when you have to squeeze the extra juice out.

Usually by the time you get your colanders ready to go it's time to ladle the slurie in! Just put a little at a time in until its full. Usually, I like to have 2 or 3 bowls with colanders ready to go. Most of the time one won't hold it all. So when one fills, just move on to the next one.

Once it's filled I usually fold the extra cheese cloth over the top, to keep it from drying out too much. I'll leave this to drain over night.

In the morning, I will usually grab the top to kind of make a bag, and squeeze the bottom with my other hand. I highly recommend gloves when doing this with plums or chokecherries. Otherwise it will stain your hands.

This is what the juice will look like when it is all drained. A nice Plumy color.

Ladle into sterilized quart jars, leaving about 1/2 inch of head space. The juice will be cold, so I usually set my dishwasher to clean and sterilize the jars after I get the pulp draining. The jars will be cold in the morning as well. But putting cold in cold you will not get any jar breakage. If you put the cool juice in a hot jar, it will break your jar.

I ended up with 5 full Quart jars and one 3/4 full quart jar. Wipe the rims, before you put the lids on.

Use your magnetic lid grabber and put the lids on, and tighten the bands to finger tight.

Add water and a couple tablespoons of vinegar to your water canner. MAKE SURE IT IS COLD! If you put a "cold" jar, (room tempurature) in boiling water it will break your jar, causeing all of the hard work you just did to go to waste. Turn the burner on medium until little bubbles start to form. Then I turn it up high until it is rapid boiling. Once it starts rapid boiling you'll want to set your timer for 10 minutes.

When you're 10 minutes are up take your jars out and there you have the necter of the gods. You can either use this right away or save it for a later time. I've only let the juice stay juice for a couple months. I'm sure it would last longer, but with any home canned product if it starts to change color or smell funny, thow it out. I would rather be safe then sorry.
So, I'll show you what to do with all of your lovely juice in the next couple weeks :)
I love your instructions and videos. My plum juice turned out perfect. The young teaching the old. Love it!
ReplyDeleteThank you! Just wanted to let you know that your instructions came in very handy! Most of the places I looked just told me how to use the boughten plums, and I had a whole pail of these babies. Thank you again.
ReplyDeleteCan you drink the juice?
ReplyDeleteHey there, can you share how you make wild plum honey? Thanks!
ReplyDeleteYour instructions were helpful, but ... PLEASE ... check your spelling. It's embarrassing and you lose credibility.
ReplyDeleteThis comment has been removed by the author.
DeleteT. Greg, You're the one that lost credibility as a human...Azz. Excuse my spelling error, if you can.
Deletesadly that was the first thing i noticed
DeleteT.Greg....Really? Her instructions are great & a lot of time was put in to help others. No credibility was lost, but you sure made a jerk out of your self!
ReplyDeleteWhat do you do with the water?
ReplyDeleteI have used these directions 3 years in a row to make plum and chokecherry jelly that we collect on the Colorado front range. One of the most helpful things on the Internet!
ReplyDeletewhat is wild plum Honey? I would love the recipe?Please
ReplyDeleteThe post is written in very a good manner and it contains many useful information for me.
ReplyDeletejuicing tips
If your plums are nice and tart don't toss the left over mash... remove pits, spread it in a lined sheet pan, put in oven on lowest setting to slowly dry out. Becomes a wonderful fruit leather.
ReplyDeleteI froze my bumper crop of wild plums and am ready to start making the juice and then the jelly. Your instructions are great. One question though: do you have to boil the juice in jars before making jelly OR can I just take the juice and start making the jelly?
ReplyDelete